Smart Agents
Blockchains are great for smart contracts and decentralization. This gives you the advantage of having cryptographically proven transactions, of which you can verify source and target account. But when you have done the first steps you may want to connect external systems to your smart contract or your blockchain application, or you want to do timed tasks on your smart contract.
For this problem the concept of the “oracle” exists. The oracle is a small component which can make transactions to your smart contract based on different triggers, e.g. timed triggers, or triggers depending on another external system.
evan.network provides a JavaScript API which connects to the evan.network blockchain and provides functionalities to create verifications, VCs, DIDs, Digital Twins, and many other features.
When you want to connect the evan.network API to your third party system, we provide a node.js framework called “smart-agents”, where you can define business logic mapped to REST APIs.
Every smart-agent is a fully functional component, which can consist of one or more REST APIs, its own configuration, and its own identity on evan.network.
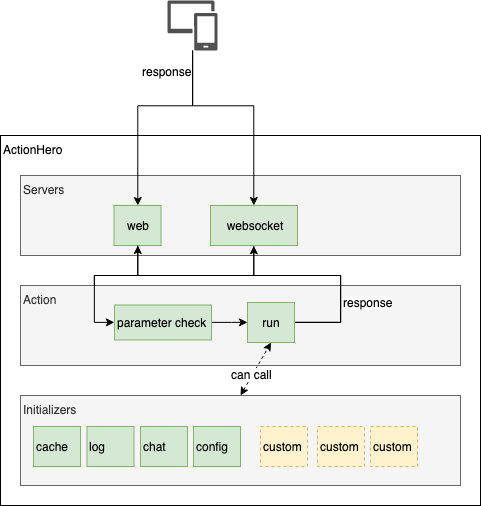
Architecture of smart agents
Let’s start with the architecture of the smart agent. The base framework we’re using is Actionhero. When you want to get detailed information about it, Actionhero has a great documentation[+]. But let’s start with the main components a smart-agent consists of:
actions (REST APIs)
Actions are basically REST APIs and a smart-agent can consist of an unlimited amount of REST APIs. Actionhero can communicate with these actions via different communication methods, like normal REST, WebSockets or also TCP sockets. An action contains a constructor which lets you define the following parameters
name- the name of an action also represents the URL of the action afterwards (e.g. http://localhost:8080/api/${name})description- a short description of what the endpoint doesoutputExample- an object which shows how the response of the action looks like (optional)inputs- in this object you define the parameters which can be passed to the action and if they are required or not
// A simple Action

const { Action, api } = require("actionhero");

class RandomNumber extends Action {
  constructor() {
    super();
    this.name = "randomNumber";
    this.description = "I am an API method which will generate a random number";
    this.outputExample = { randomNumber: 0.1234, hello: "world" };
    this.inputs = {
      hello: {
        required: true
      }
    };
  }

  async run({ response, params, connection }) {
    response.randomNumber = Math.random();
    response.hello = params.hello;
  }
}
the run function is executed when someone calls the REST endpoint for your action. The function gets the following destructured parameters as the first parameter:
params- in this object you get all the defined parameters for the actionresponse- this object is the response object which will be sent back to the clientconnection- the plain connection object where you can also check which type of connection called the endpoint
If you want to know more about the other specific options an action can have please look at the Actionhero documentation
configs
Each smart-agent gets a predefined configuration where you can put in your respective account for the smart agent. The configuration is located in the configs folder of the smart-agent. In one configuration file you can define multiple environment dependent config sets. An example configuration looks like the following:
exports['default'] = {
  ethAccounts: {
    'ETH_ACCOUNTID': 'ETH_PRIVATEKEY'
  },
  encryptionKeys: {
    'ETH_ACCOUNTID': 'PROFILE_PASSWORD'
  },
  smartAgent: (api) => {
    return {
      disabled: false,
      name: 'smartAgent',
      ethAccount: 'ETH_ACCOUNTID'
    }
  }
}

exports['customENV'] = {
  ethAccounts: {
    'ETH_ACCOUNTID2': 'ETH_PRIVATEKEY2'
  },
  encryptionKeys: {
    'ETH_ACCOUNTID2': 'PROFILE_PASSWORD'
  },
  smartAgent: (api) => {
    return {
      ethAccount: 'ETH_ACCOUNTID2'
    }
  }
}
This JavaScript file exports a default and a customENV object. Actionhero merges these configs based on the given NODE_ENV. When setting no NODE_ENV when starting the smart-agent, Actionhero only uses the default section of the config file. When the NODE_ENV now is set to customENV, Actionhero uses the settings in default first and then deep merges (and also overwrites) the values with the values set in the exports['customENV'].
initializers
Initializers’ main role in the smart-agent is setting up business logic and make it available for being called from actions. Mainly you will setup your required functions for your smart-agent in an initializer and then call the function from the action.
Actionhero provides a global api object to which you can attach new functions to it and you can use these in actions, other initializers or tasks (see Tasks[+]) for example.
All initializers for your smart-agent are located in the initializers folder in your smart-agent. An example initializer looks like the following:
const {
  api,
  Initializer
} = require('actionhero')

module.exports = class myInitializer extends Initializer {
  constructor() {
    super();
    this.name = "myInitializer";
    this.loadPriority = 1000;
    this.startPriority = 1000;
    this.stopPriority = 1000;
  }

  async initialize() {
    api.StuffInit = {
      doAThing: async () => {},
      stopStuff: async () => {}
    };

    api.log("I initialized", "debug", this.name);
  }

  async start() {
    await api.StuffInit.startStuff();
    api.log("I started", "debug", this.name);
  }

  async stop() {
    await api.StuffInit.stopStuff();
    api.log("I stopped", "debug", this.name);
  }
}
Each initializer has a constructor where you define the following values:
name- the name of the initializerloadPriority- the order in which theinitializefunction will be calledstartPriority- the order in which thestartfunction will be calledstopPriority- the order in which thestopfunction will be called
If you have multiple initializers for different tasks which also depend on each other you can define the load, start and stop priorities for the initializers. The Actionhero internal initializers have a priority below 1000 so it is useful to set the own initializer priorities above 1000. Actionhero will execute the functions in the following order:
initializestartstop- only when the process will be stopped
In these functions you can access the api object and extend it with your own custom logic. You can then use the functions everywhere in the source code where the api object is imported.
Special Addons for smart-agents
To get the dynamic blockchain functionality from evan.network into the smart-agent, using the blockchain-core API, we provide a class for you to setup the whole functionality from the blockchain-core API in your custom smart-agent project.
To get the functionality in your initializer working, you must create a class which extends the api.smartAgents.SmartAgent class.
 async initialize () {
    // specialize from blockchain smart agent library
    class SmartAgent extends api.smartAgents.SmartAgent {
      async initialize () {
        await super.initialize()

        console.dir(this.runtime)
      }
    }

    // start the initialization code
    const smartAgent = new SmartAgent(api.config.smartAgent)
    await smartAgent.initialize()

    // objects and values used outside initializer
    api.smartAgent = smartAgent
  }
As you can see in the code above you create a custom class within the initialize function which extends the api.smartAgents.SmartAgent class. At the bottom of the function a new instance of the class is created. The parameter for this class is a configuration object which we defined above in the config example. All configs are available under the api.config context. The object which should be given in the constructor should have the following structure:
{
  name: 'smartAgent',
  ethAccount: 'ETH_ACCOUNTID'
}
It should have a name and a ethAccount property. The SmartAgent base class will use this information to create a custom runtime with the given ethAccount for the initialized instance. The creation of the runtime object will start when you call the initialize function of your extended class.
After you called the function, the this context in your class instance will have the following properties:
{
  config,  // your given config as constructor param
  runtime, // initialized runtime with ethAccount as active account
  dfs,     // custom initialized ipfs with ethAccount as paying account
}
In the initialize function of your custom smart-agent class you see a log message which then prints out this.runtime. This shows that the creation of the runtime was successful and you can use all blockchain-core functionalities from now.
How to create a smart-agent
All the basics are now clarified and the last point is to show how a smart-agent is setup and can be used.
We provide a yeoman generator for evan.network related development tasks. So the first thing we have to do is installing yeoman and the generator-evan package from npm. Run the following commands:
npm i -g yo generator-evan
Create the project structure
First we have to create a basic project structure setup for the smart-agent. Therefore, create an empty folder on your file system. Then open a command line, navigate to your created folder and run the command
yo evan
in the console. You should now be asked a few questions by the generator:
? Your project name (YOUR_FOLDER_NAME)
Here you can give your project a custom name or you can use the folder name as default (simply click enter)
? Your projects description
Here you can type a description for your project
? Should a sub ENS address on the evan.network be claimed for you? (mnemonic required) (Y/n)
Now you can claim a custom ENS address on evan network for your project. Type “y” and click enter. You must now type in the mnemonic of your first generated account.
? Use which mnemonic?
After entering your mnemonic and having clicked enter, you can choose which subdomain should be claimed for your project. Please use a unique domain name since they can only be registered once for an account
? Claim which subdomain? (YOUR_FOLDER_NAME) .fifs.registrar.test.evan
After pressing enter, the domain will be claimed for your account. You can ignore the appearing error messages. When the domain is already registered, you will receive an error message looking like:
Error: cannot claim address "workshop-hem.fifs.registrar.test.evan", it's' already claimed by "0xf638C091a1a45AEDfAFC921f27E8d65AeA8C18c4"
Then you have to choose another one. When the registering process was successful you will be asked if you want to create a BusinessCenter on the domain.
? Should a business center be created at the given address? (Y/n)
Answer the question with “n”, because for this example we don’t need a BusinessCenter. When you pressed enter a list of files will be printed on the console and your initial project setup is done:
   create package.json
   create gulpfile.js
   create lerna.json
   create LICENSE.txt
   create README.md
   create scripts\bc-helper.js
   create scripts\config\deployment.js
   create scripts\config\externalAccounts.js
   create scripts\config\managedAccounts.js
   create scripts\domain-helper.js
   create scripts\evan.access.js
   create scripts\profiles-helper.js
   create VERSIONS.md
Create the smart agent
Now we create the boilerplate logic for the smart-agent to be created. Use the previously opened console in the current project folder and run the command:
yo evan:agent
You will also be asked a few questions about your smart-agent. The first one is the name of the smart-agent. You can choose a custom name or simply use the predefined name written in braces
? Name the agent: smart-agent-* (...)
After that you have to describe what the smart-agent should do.
? What does the agent do? Describe it. Smart agent which creates and manages digital twins
Now you have to configure which features you want to use within your smart.agent. Please check the boxes config, initializers, and actions/web requests with the space bar
?
        Choose which functionalities you will need in your agent.
        config and initializers are practically always required.
         (Press <space> to select, <a> to toggle all, <i> to invert selection)
>(*) config
 (*) initializers
 (*) actions/web requests
 ( ) commands/command line tools
After pressing enter, you will be asked which accounts you want to add to the smart agent. You should now see your previously configured account with the key “deploymentAccount” in the list. Check the account with the space bar and click enter:
? Add accounts to smart agent configuration:
>(*) deploymentAccount, 0x0630EE563cdf67a2DdE9161405B722f5AEfee18A,
Now the generator copies the required files for the smart-agent to your project workspace and runs an “npm install” in the folder.
In case yeoman reports a “conflict” in the package.json choose ‘y’ to overwrite it.
      Created 'smart-agent-your-name'.

      Run 'gulp link-agents' to link it into edge-server.
      Run 'npm start' to start edge-server.
It finishes with the above message. Now you have to run
npx gulp link-agents
to symlink everything up.
The smart-agent uses an open source key-value database called REDIS to add caching abilities. You have to install and start REDIS on your host machine. Where and how you get REDIS for your OS is described here:
# On docker
docker run --name redis -p "6379:6379" -d redis

# On OSX With Homebrew:

brew install node
brew install redis
brew services start redis # this will keep redis running in the background forever

# On Ubuntu:

(sudo) apt-get install node
(sudo) apt-get install redis-server
redis-server --daemonize yes # this will keep redis running in the background for this session

# On Windows:

[download nodeJS](https://nodejs.org/en/download)
[download redis](https://github.com/MSOpenTech/redis)
run redis.exe in a bcackground window
After installing and starting REDIS you can run “npm start” to start your smart-agent.
Packaging with Docker
After you have finished the development of your smart-agent, you can create a docker container for it. This way you can run it on every docker environment. The sample Dockerfile is below:
FROM node:12 as install

# Make ssh dir
RUN mkdir /root/.ssh/

RUN ssh-keyscan -t rsa github.com >> ~/.ssh/known_hosts

ADD . /edge-server

WORKDIR /edge-server

RUN rm -rf node_modules && \
  npm install && \
  cd smart-agent-YOUR_NAME && \
  npm install

RUN npx gulp link-agents

CMD ["npm", "start"]
EXPOSE 8080
After the build has finished you can run your smart-agent with the following docker-compose.yml
version: '2'
services:
  redis:
    image: redis
  smart-agent:
    restart: always
    image: YOUR_TAG_NAME
    ports:
     - "8080:8080"
    depends_on:
      - redis
    links:
      - redis
    environment:
      REDIS_HOST: redis
      REDIS_PORT: 6379
      REDIS_DB: 0
      ETH_WS_ADDRESS: 'wss://testcore.evan.network/ws'
      NODE_ENV: 'testcore'
    logging:
      driver: "json-file"
      options:
        max-size: "10m"
Switching to evan mainnet (core)
When you successfully tested your smart-agent on the testnet and you now want to use it in production, you have to adjust your configuration of the agent.
As you can see in the docker-compose above we defined the environment variables ETH_WS_ADDRESS and NODE_ENV. These two variables are currently pointing to the testnet environment. When you want to switch to the mainnet, you must adjust the environment variables to the following:
ETH_WS_ADDRESS: 'wss://core.evan.network/ws'
NODE_ENV: 'core'
Also in your configuration file you have to create an export for the core environment if you have different accounts on the core network.
exports['core'] = {
  ethAccounts: {
    'ETH_ACCOUNTID_MAINNET': 'ETH_PRIVATEKEY_MAINNET'
  },
  encryptionKeys: {
    'ETH_ACCOUNTID_MAINNET': 'PROFILE_PASSWORD_MAINNET'
  },
  smartAgent: (api) => {
    return {
      ethAccount: 'ETH_ACCOUNTID_MAINNET'
    }
  }
}
Additional built in smart-agent features
We have enhanced the api object of the Actionhero with a few additional features which can help you building your blockchain application faster. Keep that in mind when using the smart-agent.
Block watcher
In case you want to iterate over all upcoming transactions and blocks, we provide a block event emitter where you get all new blocks with all transactions in this block.
You can use the functionality the following way:
api.eth.blockEmitter.on('data', async (block) => {
  const filteredTransaction = block.transactions
  console.dir(block)
  console.dir(block.transactions)
})
The blockEmitter emits every new block in the blockchain with all included transactions.
Authenticated request
The smart-agent can be used to provide a REST API which can execute blockchain transactions. Now imagine you want an access layer, so that only particular accounts can use an action on the smart-agent
In Actionhero you can attach so called “middlewares” to actions which can prevent the execution or also enrich or format parameters before the run function gets executed.
We built a middleware for actions which ensures a authentication header from the calling browser/mobile device. This is done with a Ethereum signed message from a given private key.
To add the middleware to your action include it the following way:
const { Action } = require('actionhero')

class Authenticated extends Action {
  constructor () {
    super()
    this.name = 'authenticated'
    this.description = 'Will check if message is signed properly, will throw error if not.'
    this.outputExample = {
      isAuthenticated: true
    }

    this.middleware = ['ensureEvanAuth']
  }

  async run ({ response }) {
    response.isAuthenticated = true
  }
}

module.exports = Authenticated
In the constructor of the action you add the middleware array with the entry ensureEvanAuth. This now checks the request for an Authorization Header with the following markup:
Authorization: \
EvanAuth 0xA1cFB71f0207B0da24bB00dF306D06EF721dB482,\
EvanMessage 1557479808692,\
EvanSignedMessage 0x8e5289cbf79f7c1ea9b871d0180d512ec1e317b3194604d15e009fb71b97e64e2be2e9f7eef4f4f7ea0382cf696690896704e8046781d8bda441f5a91baa96781c
The three values in the header have the following meanings:
EvanAuth: accountId of signing userEvanMessage: current UNIX timestamp in milliseconds, timestamp may not be older than 5 minutesEvanSignedMessage: cryptographically signed EvanMessage (signed with private key of the account set in EvanAuth)
You can generate the Authentication Header with web3:
const now = Date.now()
const signedMessage = web3.eth.accounts.sign(now, `0x${privateKey}`)
const header = `EvanAuth ${accountId} EvanMessage ${now} EvanSignedMessage ${signedMessage.signature}`
Be careful not to let too much time pass between creating the message and submitting it to the action, as the message is not allowed to be older than five minutes.
When all checks are fine, your action’s run function will start, otherwise the action will return an error with the following response:
"error": "No verified Account.",
This error means, that the signed message you provided does not match the defined account in the “EvanAuth” section in the authorization parameter.
You can verify the signed message with web3 the following way:
const now = Date.now()
const signedMessage = web3.eth.accounts.sign(`${accountId}|${now}`, `0x${privateKey}`)
const accountId = web3.eth.accounts.recover(
  `${accountId}|${now}`,
  signedMessage.signature
)
The accountId variable must match the defined accountId in the “EvanAuth” section. The accountId must be written in checksum case
"error": "no authorization headers provided",
The sent request has no attached Authorization header. Please add an Authorization header with the markup above.
"error": "signed message has expired",
The signed timestamp has expired. When you sign a timestamp it is valid for 5 minutes. Otherwise the REST endpoint will return this message and you have to provide a new signed timestamp.
Home |
FAQ |
Github Repo |
Gitter Community |
Website |
Blog |
API docu |
UI docu |
Imprint
 This work is licensed under a Creative Commons Attribution-ShareAlike 4.0 International License.